Device & Controller Setup Guide - Aruba Central Configuration for Kiwire
- synchrowebmarketing
- Oct 27, 2020
- 2 min read
A. Aruba Central Configuration
1. Adding Kiwire as authentication server and external captive portal

Locate “Wireless Management” on the left sidebar
Go to and select “Wireless Management” module labeled as “WL”
Go to “Security” tab on the left sidebar

In the “EDIT SERVER”menu locate and select “RADIUS”
Enter your Kiwire IP Address in the IP Address input area
Create a shared key by filling up “Shared Key” and “Retype Key” field with identical input.

Place a check-mark on the checkbox in “Dynamic Authorization”
On the right column section set “Auth Port” and “Accounting Port” accordingly
Next, under “Query Status of RADIUS Servers (RFC 5997)” place a check-mark on “Authentication” and “Accounting” input options.

Scroll downwards the left column to locate “Service Type Framed User”, place a check-mark on “Captive Portal” input option to enable captive portal.
Save settings by clicking on the “Save” button.

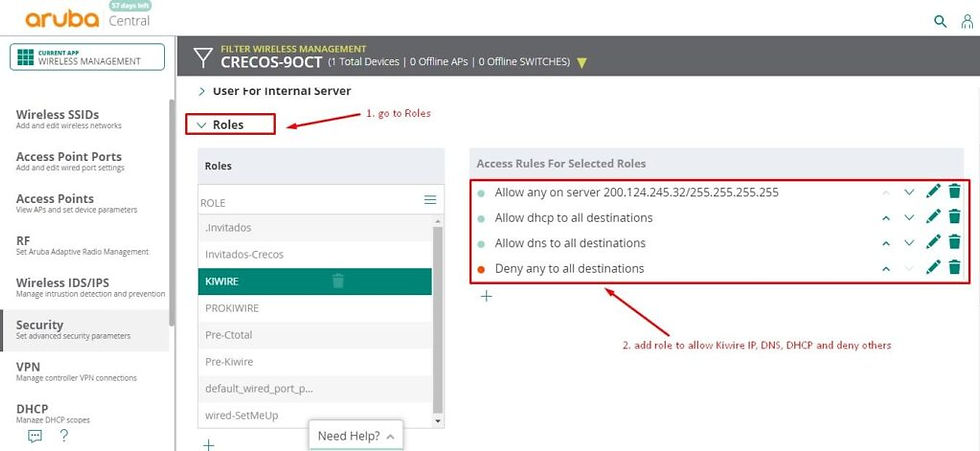
On the dropdown menu select “Roles”
Locate KIWIRE and modify rule settings for the selected role on the right menu.
Add rule to allow Kiwire IP, DNS, DHCP and deny others.

Scroll further below to find the “Walled Garden”.
Go to Walled Garden “Whitelist” section on the right column to add Kiwire domain as whitelist.

Go to “External Captive Portal” and make the following changes.
Select the drop down box in Authentication Type and select “RADIUS authentication”.
Under “IP or Hostname” fill up the input box with Kiwire domain or IP.
Under “URL”, key in the input box with the redirection URL “/user/aruba_login.php”
Under “Port”, key in the input box with the Kiwire web port “443”
Under “Use HTTPS” checkbox option , place a check-mark to enable only if you are using SSL.

Go to and select “Wireless SSIDs” on the left sidebar.
Locate and select the “Security” tab on the right content panel.
Under “Security Level” use the drag slider and select “Captive Portal” security level.
Scroll below to find “Splash Page” settings.
Under “Captive Portal Type”, select “External” option on the drop-down menu.

Select Authentication server by following the configuration below:
Under “Captive Portal Profile, select “Kiwire-CT” under the drop-down menu
Under “Primary Server”, select “Kiwire-CT” under the drop-down menu

Under advanced setting select authentication server as accounting using the following configurations.
Go to “Accounting” and select “Use authentication servers” from the drop-down input option.
Go to “Accounting interval” and set “5” minutes as interval.

Under “Walled Garden” section, ensure that the Kiwire hostname is listed inside Whitelist category on the right column.

After all Security settings have been completed, proceed to the “Access” tab .
Under “Access Rules”, select “Role Based” on the drag slider.

Under “Assign Pre-Authentication Role” place a check-mark on the drop-down input and select “Pre-Kiwire”.
B. Kiwire Configuration

1. Set Bandwidth limit.
Go to “Devices” category on the sidebar menu.
Under “Device Type” set to “Aruba”.
Under “NAS identifier” set an AP MAC without colon
Under “IP Address” set the AP IP Address
Under “Shared Secret Key” ensure that it is using the same shared key with Aruba Central.
Under “COA Port” ensure that port number is “3799”.

Go back to the “Security” menu in Aruba Central
Go to “Roles”
Add a Role name
Set bandwidth contract

Go back to Kiwire platform, Go to “Policies” in the sidebar menu.
Go to “Radius Attribute”
Select profile
Set Attribute to a Aruba-User-Role
Ensure that “Value” follow role name from Aruba Central.
2. Configuration setup is now complete.
Related Posts
See AllPart 1: Cambium cnMaestro configuration Go to WLANs > Configuration > AAA Servers i. Authentication Server Host: kiwire ip address or...
Device Configuration – How to Create a Group with Bandwidth Capping for FortiOS Go to Account > Profile, create a profile with any name....
Modules allowed for Kiwire Retail: 1. Configuration > Organisation Profile 2. Integrations > Social Network 3. Device > NAS 4. Login...
Comments