Kiwire 3.0 Administrator - Device & Controller Setup Guide
Kiwire 3.0 Administrator - Device & Controller Setup Guide
Cambium Networks Configuration for Kiwire Hotspot
Cambium Networks Configuration for Kiwire Hotspot
Prerequisites
Before integrating the controller with Kiwire, it is necessary that the controller and access point:
-
are connected to the Internet
-
are reachable on the network
-
have an IP address assigned to the a through DHCP or static
Note:
-
Kiwire-hostname or Kiwire-ip can be obtain by contacting our technical support for our cloud customer. For enterprise client the ip will be on premises Kiwire ip address.
-
Social network hostname list can be obtained from Social network whitelist guide
Part 1: Cambium cnMaestro configuration
-
Login to your Cambium cnMaestro controller
-
Go to WLANs > Configuration > AAA Servers
-
Authentication Server
-
Host: Kiwire-hostname or Kiwire-Ip
-
Secret: create a secret pass phrase
-
Port: 1812
-
Timeout: 3 seconds
-
Attempts: 1
-
-
Accounting Server
-
Host: Kiwire-hostname or Kiwire-ip
-
Secret: secret same as authentication server
-
Port: 1813
-
Timeout: 3 seconds
-
Attempts: 1
-
Accounting Mode: Start-Interim-Stop
-
Accounting Packet: ticked
-
Interim Update Interval: 1800 seconds
-
-
Advanced Settings
-
NAS-Identifier: AP MAC address with capital letters and colon
-
Dynamic Authorization: ticked
-
Dynamic VLAN: ticked
-
Called Station ID: AP-MAC:SSID
-
-
Omaya 3.0 Administrator > Quick Setup > Dashboard
Documentation
Kiwire 3.0 Administrator > Accounts & Finances > Generate Topup Code
Kiwire 3.0 Administrator - Accounts & Finances
Account - Generate Topup Code
Topup code are single use codes used to gain Internet access through a Captive Portal. Each roll of vouchers is cryptographically generated and includes a set time limit. Vouchers are common in places where an organisation wants authenticated, but time-limited, Internet access without needing to provide a username and password to users.
Learn how to generate the topup code here below.
1) Allow Topup Voucher in Module Configuration
Go Configuration > Settings > Topup > Turn On Allow topup voucher , Allow topup account/ user and Carry forward topup.

2) Login Engine > Page Designer > Add page

a) Click to add content > More > Choose Topup Code template
or you can click the arrow button at the right side > choose Topup code template > Drag the template to Empty space.
i). Insert the username and code
ii). Click Save


3) Generate topup code
-
Generate Topup Code
-
Number of Code – How much topup code want to generate
-
Price – The price of the Topup
-
Code Length – The length of code that will be generated
-
Additional Transfer Quota – Compulsory – Speed of topup code in MB


4) Topup has been generated

5) View Topup information

6) Create User in user module
a). Go to Accounts > Users > Click Add User
b). Fill up the form and click Create


Next step is how to clear cache at the Kiwire system.
Go to Help & Tools > System Quick Fix

How to check remaining balance time, quota and usage history
1). Go to IP Address, for example 4.4.4.4/cpanel

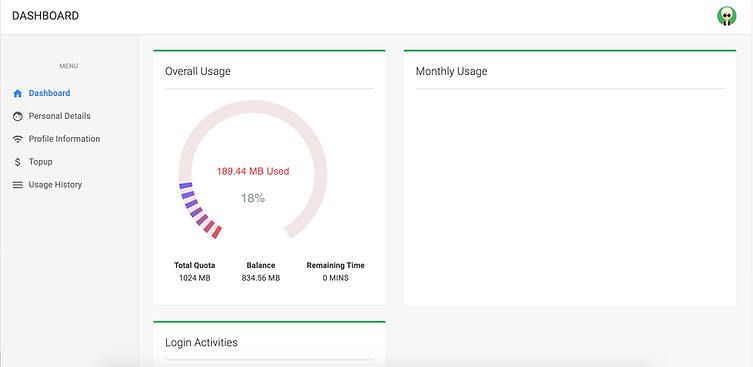
2). Dashboard – To view overall usage of quota and monthly usage. Can be downloaded the report in SVG and PNG.

3). Personal Details – From here, you can see and edit all user personal details including full name, email address, phone number, status of subscription, creation date, expiry date, profile name [Subscribe] and profile name [current].


4). Profile Information – From here, you can see all details of current usage including total transfer, total time, first login, last login.

5). Profile Information – From here, you can see all details of profile name, profile type, price, simultaneous user, max upload speed & max download speed.

6). Topup – From here, you can see all details of quota remaining and time remaining. You can also insert your topup code at here if you have request for additional quota.
i). Quota Remaining – Balance quota left
ii). Time Remaining – Balance time remaining
iii). Topup – To topup, generate topup code in Kiwire, enter the code inside the text box.

7). Additional Topup - How to Generate topup in Kiwire dashboard system.
a). Assign additional quota is 100MB and additional minutes 30 minutes.

b) Enter the code inside the text box.

c). The top up added successfully. The quota and time have been changed to the value that has been added.
