Kiwire 3.0 Administrator - Device & Controller Setup Guide
Kiwire 3.0 Administrator - Device & Controller Setup Guide
Cambium Networks Configuration for Kiwire Hotspot
Cambium Networks Configuration for Kiwire Hotspot
Prerequisites
Before integrating the controller with Kiwire, it is necessary that the controller and access point:
-
are connected to the Internet
-
are reachable on the network
-
have an IP address assigned to the a through DHCP or static
Note:
-
Kiwire-hostname or Kiwire-ip can be obtain by contacting our technical support for our cloud customer. For enterprise client the ip will be on premises Kiwire ip address.
-
Social network hostname list can be obtained from Social network whitelist guide
Part 1: Cambium cnMaestro configuration
-
Login to your Cambium cnMaestro controller
-
Go to WLANs > Configuration > AAA Servers
-
Authentication Server
-
Host: Kiwire-hostname or Kiwire-Ip
-
Secret: create a secret pass phrase
-
Port: 1812
-
Timeout: 3 seconds
-
Attempts: 1
-
-
Accounting Server
-
Host: Kiwire-hostname or Kiwire-ip
-
Secret: secret same as authentication server
-
Port: 1813
-
Timeout: 3 seconds
-
Attempts: 1
-
Accounting Mode: Start-Interim-Stop
-
Accounting Packet: ticked
-
Interim Update Interval: 1800 seconds
-
-
Advanced Settings
-
NAS-Identifier: AP MAC address with capital letters and colon
-
Dynamic Authorization: ticked
-
Dynamic VLAN: ticked
-
Called Station ID: AP-MAC:SSID
-
-
Omaya 3.0 Administrator > Quick Setup > Dashboard
Documentation
CONFIGURE THE FILTER ON TP-LINK DEVICES
You can activate the content filter on any TP-Link devices by following these steps:
If you haven’t registered yet, you can do it now for free here: Click here to register.
Connect to the dashboard by entering the IP address of your TP-Link in your browser. Then insert your credentials to log in.
First of all, you need to change the DNS of your device.
-
To do that, click on the [Network] menu and open the [WAN] submenu.
-
Click on [Advanced] to configure DNS used by TP-Link.
-
Type 185.236.104.104 in the Primary DNS field and 185.236.105.105 in the Secondary DNS field.

Now you need to configure the dynamic DNS service. To do that, open the [Dynamic DNS] menu and configure it as follow:
-
Service Provider: Choose the Dyndns service. NB: you do not have to register for the dyndns service, it works anyway because the filter redirects the request to itself.
-
Username: Type in the cloud content filter’s registration username.
-
Password: Type in the cloud content filter’s password.
-
Domain: Insert a domain name. you like. For example, domain.
-
Check the box Enable DDNS.
-
Click on [Login] to force synchronization and then on [Save] to apply the changes.
NOTE: do not worry if the message DDNS not launching! pops up. Ignore it.

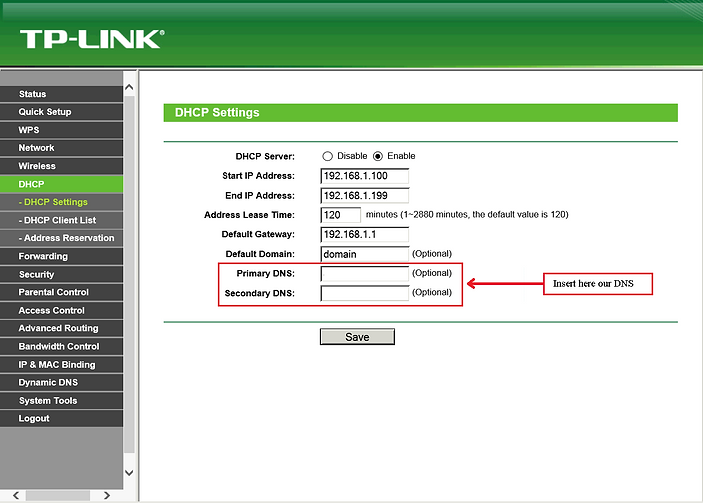
To enable and configure the DHCP server, open the [DHCP] menu and then click on [DHCP Settings].
Enable the service and configure it in the following way:
-
Start IP Address: Type the first IP of the DHCP range.
-
End IP Address: Type the last IP of the DHCP range.
-
Address Lease Time: Choose the DHCP lease time (in seconds).
-
Default Gateway: Insert the default gateway of your network.
-
Default Domain: Insert the domain name, if any.
-
Primary DNS: Filter’s primary DNS: 185.236.104.104
-
Secondary DNS: Filter’s secondary DNS: 185.236.105.105
-
NB: If you have configured our DNS on TP-Link, you can type in the IP of device as the primary DNS.
-
Finally, click on [Save] to apply the configuration.
