Kiwire 3.0 Administrator - Device & Controller Setup Guide
Kiwire 3.0 Administrator - Device & Controller Setup Guide
Cambium Networks Configuration for Kiwire Hotspot
Cambium Networks Configuration for Kiwire Hotspot
Prerequisites
Before integrating the controller with Kiwire, it is necessary that the controller and access point:
-
are connected to the Internet
-
are reachable on the network
-
have an IP address assigned to the a through DHCP or static
Note:
-
Kiwire-hostname or Kiwire-ip can be obtain by contacting our technical support for our cloud customer. For enterprise client the ip will be on premises Kiwire ip address.
-
Social network hostname list can be obtained from Social network whitelist guide
Part 1: Cambium cnMaestro configuration
-
Login to your Cambium cnMaestro controller
-
Go to WLANs > Configuration > AAA Servers
-
Authentication Server
-
Host: Kiwire-hostname or Kiwire-Ip
-
Secret: create a secret pass phrase
-
Port: 1812
-
Timeout: 3 seconds
-
Attempts: 1
-
-
Accounting Server
-
Host: Kiwire-hostname or Kiwire-ip
-
Secret: secret same as authentication server
-
Port: 1813
-
Timeout: 3 seconds
-
Attempts: 1
-
Accounting Mode: Start-Interim-Stop
-
Accounting Packet: ticked
-
Interim Update Interval: 1800 seconds
-
-
Advanced Settings
-
NAS-Identifier: AP MAC address with capital letters and colon
-
Dynamic Authorization: ticked
-
Dynamic VLAN: ticked
-
Called Station ID: AP-MAC:SSID
-
-
Omaya 3.0 Administrator > Quick Setup > Dashboard
Documentation
CONFIGURE THE FILTER ON TELDAT DEVICES
To activate the cloud filter on Teldat devices, follow these steps:
If you haven’t registered yet, you can do it now for free here: Click here to register.
Connect to the dashboard by entering Teldat’s IP address in your browser. Then insert your credentials to log in.
First of all you need to change the DNS on your device.
For the webfilter ter to work on your devices, you have to configure your router and replace the DNS with ours.
To that purpose, access the router dashboard and enter the following commands:

The webfilter works with both dynamic and static IPs. If you have a dynamic IP, configure the DynDNS on the router as shown below:

OPTIONAL: DENY DNS CHANGES BY USERS
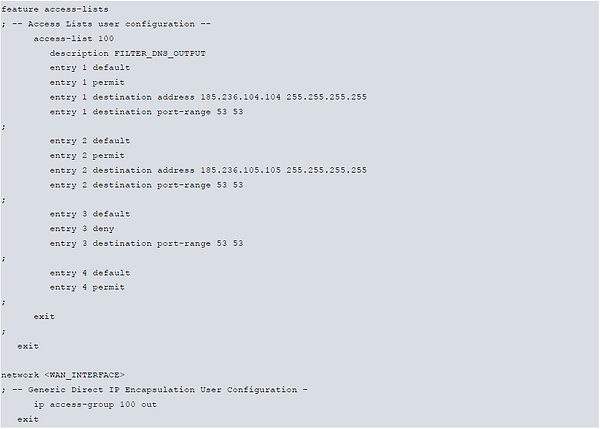
It is possible to enforce security by preventing users from changing the DNS. In order to do that, you just have to create a new access list that will be used on the WAN Interface as follows:

OPTIONAL: MULTIPROFILE CONFIGURATION
The advanced feature called Multiprofile allows you to create multiple profiles per customer/license and makes it possible to associate them with a single network (IP address). The webfilter recognises the remote network (and the configuration profile) based on the public IP.
If, for example, you have address 1.2.3.4, you may use the following ports:
-Standard 53 port (default profile);
-Other ports (110,143,5402,5403).
As you can see there are two profiles (Default and Profile 2), respectively Port 53 and 5402.
Every time you want to create two or more profiles per network (same IP address), you need to configure a different port for each profile.
First enable the AFS functionality:

Then change the DNS request (port 53) to the new port via NAT:
Note: Note that into PORT_PROFILE2 you have to enter another port different from 53 between 110,143,5402 and 5403.

Note: Default is already linked to port 53, so no special configuration is needed for it.
Here is an example of configuration of the webfilter with multiprofile or Dynamic DNS on Teldat, so that only Teldat’s DNS servers can be used:


